
how to replace bike brake pads easily comes down to two things: identifying what brakes you have, then swapping pads without contaminating them or misaligning the caliper.
If your brakes squeal, feel “mushy,” take longer to stop, or the lever pulls close to the bar, pads are often the first (and cheapest) place to look. The tricky part is that road, mountain, and commuter bikes can use very different pad shapes and retention hardware, so guessing usually wastes time.
This guide walks through rim brakes and disc brakes, shows what “worn out” really looks like, and gives a practical checklist so you can decide whether you’re good to DIY or it’s smarter to let a shop handle it.
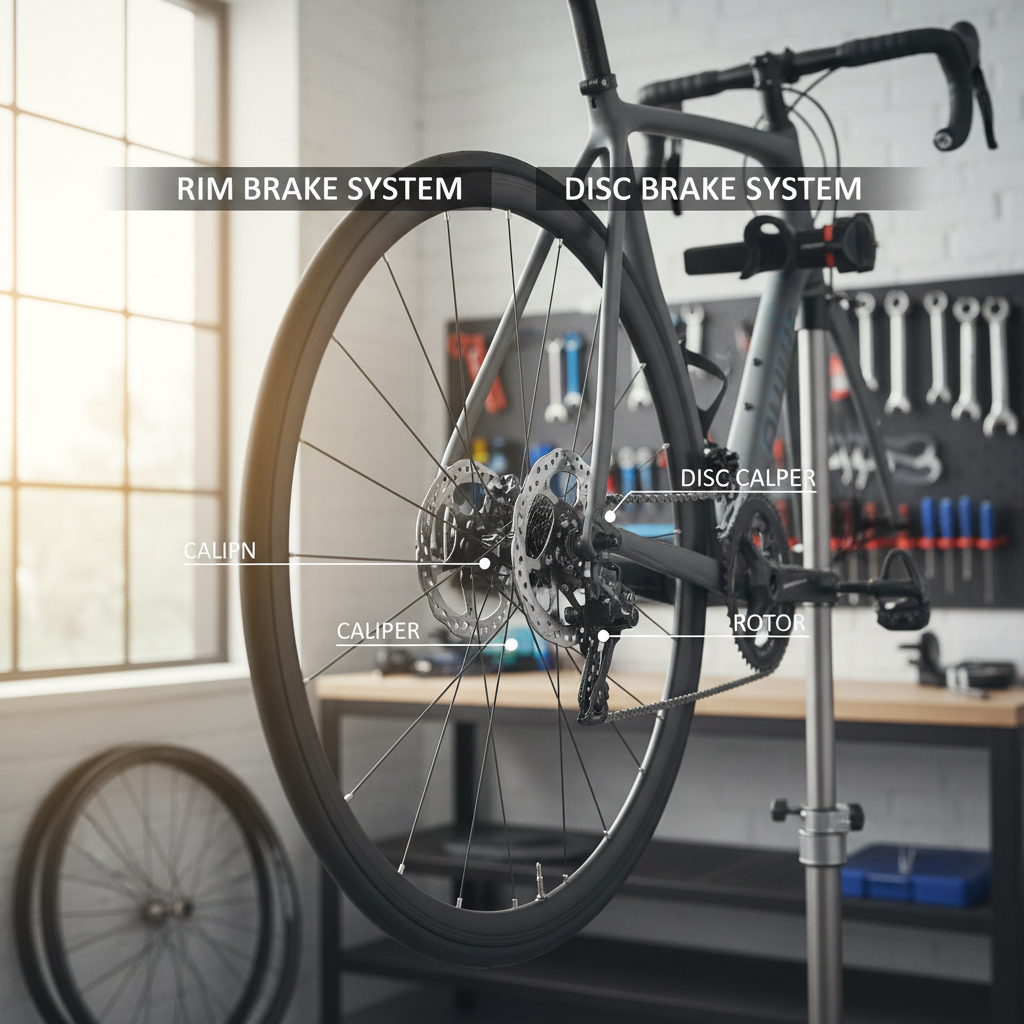
Know what you’re working on: rim vs. disc (and why it matters)
Before you buy anything, confirm your brake system. Pad swaps are easy when you match the right pad type and follow the retention method the brake was designed for.
- Rim brakes: pads press on the wheel rim. Common on older road bikes, hybrids, and many budget bikes.
- Disc brakes: pads clamp a rotor at the hub. Common on modern road, gravel, and mountain bikes.
- Mechanical disc: cable pulls the caliper arm.
- Hydraulic disc: fluid drives pistons. More power, but a couple extra “don’t mess this up” moments.
According to Shimano, disc brake pads and rotors should be kept free from oil and grease because contamination can reduce braking performance. That one sentence explains a lot of “my new pads still squeal” stories.
Quick wear check: when pads actually need replacement
You don’t need to wait for metal-on-metal drama. Most riders replace earlier because braking feel drops long before it becomes unsafe.
Disc brake pad wear signs
- Pad material looks thin: many pads start around 3–4 mm of friction material; when it’s roughly 1 mm or less, replacement is usually the call.
- Glazing: shiny, hardened pad face, often paired with squeal.
- Uneven wear: one pad much thinner can hint at a sticky piston or misaligned caliper.
- Lever travel increases: especially on hydraulics, it can mean pad wear or air in the system.
Rim brake pad wear signs
- Wear indicator line: many rim pads have grooves; when grooves fade, it’s time.
- Cracks or chunks missing: rubber ages, especially in heat or stored outdoors.
- Metal bits embedded: can chew up rims, which gets expensive fast.
Key point: if you hear a harsh scraping sound, stop and inspect. Riding through it can damage rotors (disc) or rims (rim brakes).
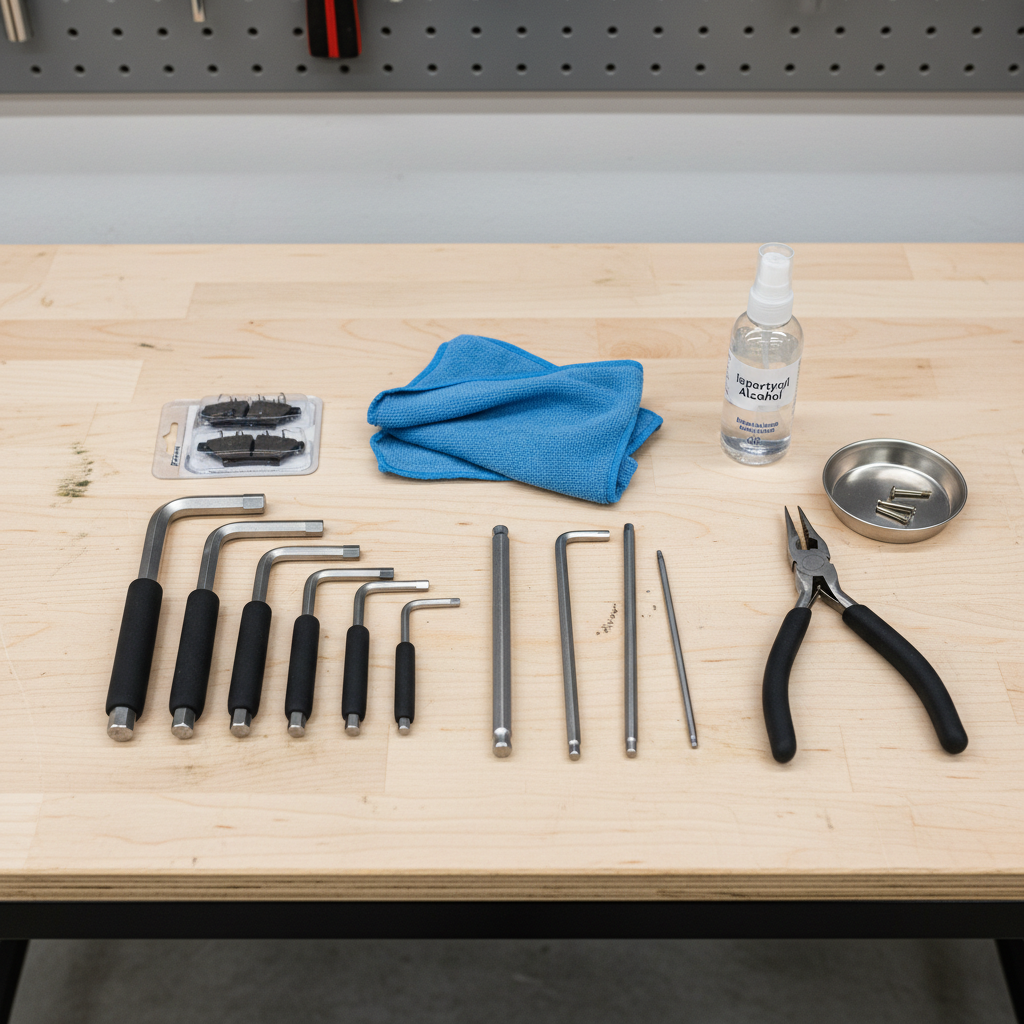
Tools, parts, and a simple compatibility table
Most pad swaps are a 10–25 minute job, assuming you have the right parts. The “right parts” part is where people get stuck.
| Brake type | What you’ll likely need | Common tools | Extra notes |
|---|---|---|---|
| Rim brake (V-brake/canti) | Rim pads (pair), maybe new washers | 5mm Allen key | Pad angle and toe-in matter for noise |
| Rim brake (road caliper) | Cartridge inserts or whole pads | 4/5mm Allen key, small pliers | Cartridges save money long-term |
| Mechanical disc | Disc pad set, pin/clip (sometimes reusable) | Allen keys, needle-nose pliers | May need to dial cable tension after |
| Hydraulic disc | Disc pad set, pad spring, pin/bolt | Allen/Torx keys, clean rag, isopropyl alcohol | Avoid squeezing lever with wheel/rotor removed |
For disc brakes, pad shape is brand-and-model specific. If you’re unsure, pull one old pad and match it by shape, or look up the caliper model printed on the caliper body.
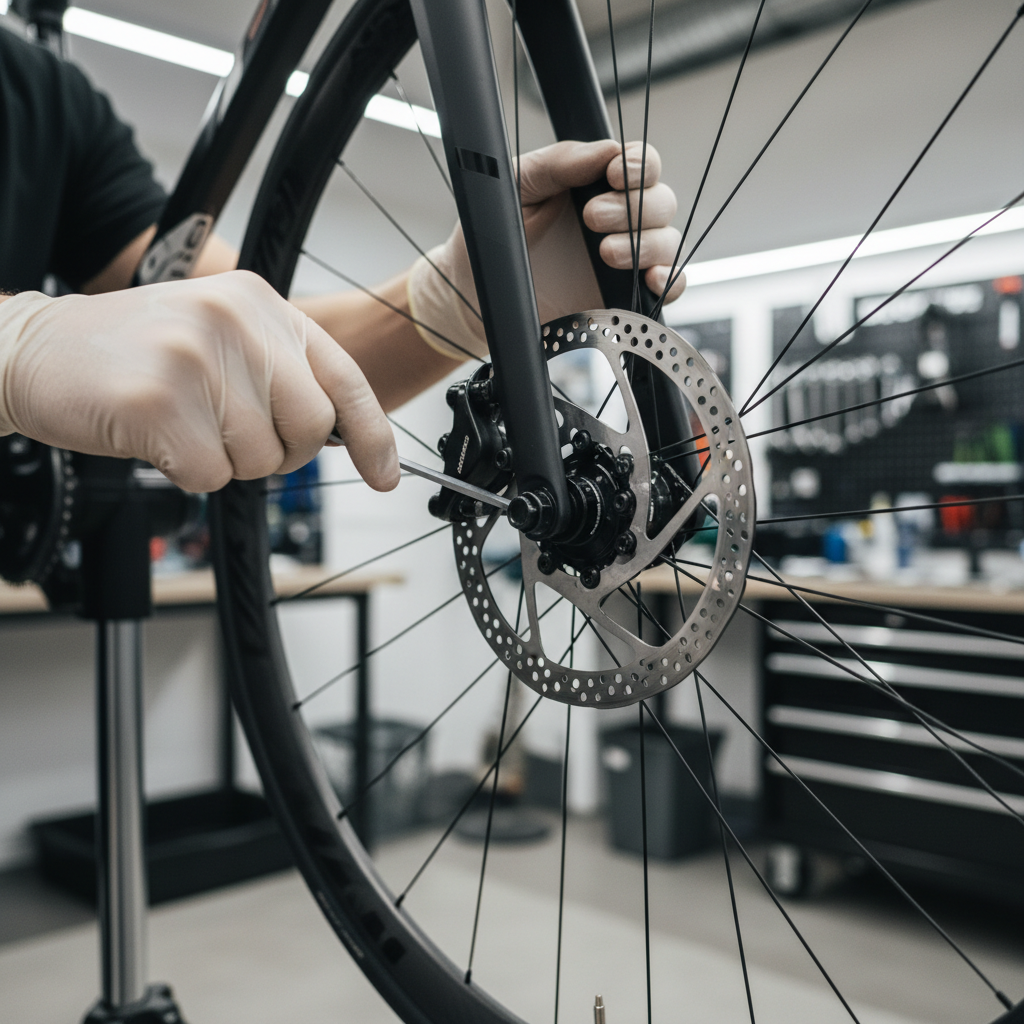
How to replace disc brake pads (mechanical or hydraulic)
This is the workflow that tends to keep things clean and predictable. If you’re aiming for how to replace bike brake pads easily, treat “clean” like a step, not a vibe.
Step-by-step
- 1) Stabilize the bike: a repair stand helps, but leaning the bike securely also works.
- 2) Remove the wheel: gives you access and reduces the chance you touch the rotor with greasy fingers.
- 3) Inspect the rotor: if it’s oily, clean with isopropyl alcohol and a lint-free cloth.
- 4) Remove the pad retention hardware: usually a pin, bolt, or cotter clip. Keep small parts in a tray.
- 5) Slide out old pads and spring: note orientation so the new set goes in the same way.
- 6) Reset pistons: gently push pistons back into the caliper using a plastic tire lever or a dedicated piston tool. Move slowly.
- 7) Install new pads: avoid touching pad faces, insert pads plus spring, then reinstall the pin/bolt/clip.
- 8) Reinstall wheel and align caliper: spin the wheel, check for rub, then loosen caliper bolts slightly, squeeze lever to center, retighten evenly.
- 9) Bed-in the pads: do multiple controlled stops from moderate speed, letting brakes cool briefly between. This improves power and often reduces noise.
Hydraulic caution: if you squeeze the brake lever with the rotor removed, pistons can advance too far. Many riders can recover by resetting pistons carefully, but if fluid leaks or the lever feel changes suddenly, a shop visit is usually the safer path.
How to replace rim brake pads (road calipers and V-brakes)
Rim pads are more forgiving about handling, but alignment matters a lot. A pad that hits the tire sidewall is not a “ride it and see” situation.
Road caliper brakes
- Cartridge-style: loosen the small retaining screw, slide the rubber insert out, slide new insert in the correct direction (often marked), tighten screw.
- Non-cartridge: remove pad fixing bolt, swap the whole pad, then align.
V-brakes / cantilever
- Loosen the pad bolt, remove pad and washers.
- Install new pad with washers in the same order, snug but not final-tight.
- Align pad face flat to the rim braking surface, not the tire and not below the rim.
- Optional toe-in: front of pad touches rim slightly before the rear to reduce squeal. Small adjustments make a big difference.
After tightening, squeeze the brake hard a few times, then re-check alignment because pads can creep as bolts settle.
Self-check checklist: did you finish the job safely?
This is the part many people skip, then wonder why the first ride feels off. A 60-second check saves headaches.
- Brake lever feel: firm and consistent, not pulling to the bar.
- Wheel spins freely: light brush is tolerable on some disc setups, constant drag is not.
- No rotor or rim contamination: no oily fingerprints, no chain lube overspray.
- Hardware secured: pins clipped, bolts snug, caliper bolts tightened evenly.
- Test stop at low speed: do this before heading into traffic or downhill.
Common mistakes that make new pads feel worse
New pads should improve braking, but a few classic missteps can make them noisy or weak.
- Skipping bed-in: disc brakes often feel underpowered until transfer layer forms on the rotor.
- Touching pad faces: skin oils can contribute to squeal. Handle by the backing plate.
- Not cleaning the rotor: if old pads were contaminated, the rotor often carries residue.
- Forcing pistons back fast: can stress seals, and on some systems may push fluid back oddly.
- Rim pad misalignment: pad hitting tire, dipping under braking surface, or toe-in that’s exaggerated.
- Mixing pad compounds blindly: resin vs. metallic has different feel and noise tendencies, and some rotors specify compatibility.
According to SRAM, proper pad bedding is part of getting consistent braking performance. If stopping power feels unpredictable after a swap, revisit bed-in before assuming something is “wrong.”
When it’s smarter to get a bike shop involved
DIY pad replacement is usually straightforward, but a few situations deserve extra caution.
- Hydraulic lever goes to the bar after the swap, or you suspect air in the system; a bleed may be needed.
- Persistent rotor rub you can’t fix with caliper alignment, especially if the rotor looks warped.
- Sticky pistons or uneven pad wear that returns quickly, which can point to service needs.
- Rim damage from worn pads, deep grooves, or cracks; wheel safety can be affected, a professional inspection is usually wise.
If you’re unsure about any braking issue, riding conservatively and consulting a qualified mechanic is often the safest move.
Practical tips to make the next replacement easier
If you want how to replace bike brake pads easily next time too, set yourself up now.
- Take a photo before removing hardware, especially pad springs and clips.
- Write down pad model in your phone notes so reordering is painless.
- Keep rotors and pads clean: apply chain lube carefully, wipe overspray immediately.
- Check pads regularly: quick visual checks prevent last-minute surprises before a ride.
Bottom line: pad replacement is a high-impact maintenance task, and most riders can handle it with patience, cleanliness, and a short test ride. Pick the right pad, install carefully, bed-in properly, then trust your brakes again.
If you plan to ride soon, do one more low-speed braking test in a safe area, then head out with a little extra following distance until everything feels fully settled.