
what tools every cyclist should have depends on where you ride, how far you go, and how comfortable you are fixing small issues on the side of the road or trail.
If you’ve ever walked a bike home because of a flat, a loose bolt, or a slipping saddle, you already know the real pain point: most “breakdowns” are small, but they happen at the worst time. A compact, well-chosen tool kit turns those moments from trip-ending into mildly annoying.

This guide focuses on the practical essentials, not the fantasy “mobile workshop.” You’ll get a clear checklist, a quick table for choosing the right kit, and step-by-step advice for building something you’ll actually carry.
Key takeaways: carry what solves the most common failures, match tools to your bike’s fasteners, and practice one or two repairs at home so you’re not learning in a parking lot.
Start with the problems you’re most likely to face
Most rides end early for boring reasons: air leaks, loose hardware, or a chain that won’t behave. The trick is packing tools that fix high-frequency issues without turning your jersey pockets into a hardware aisle.
- Flat tires: nails, glass, pinch flats, or slow leaks.
- Loose bolts: bottle cages, saddle clamps, stem/handlebar bolts, cleats.
- Chain issues: dropped chain, stiff link, broken link on higher-mileage chains.
- Minor fit adjustments: saddle height or angle drifting mid-ride.
- Emergency cleanup: a greasy chain that ruins your grip and mood.
According to NHTSA, being visible and predictable is a major component of road safety, so a “tool kit” mindset also includes basic safety items like lights and a way to communicate if you’re stranded.
The must-have tools for almost every cyclist
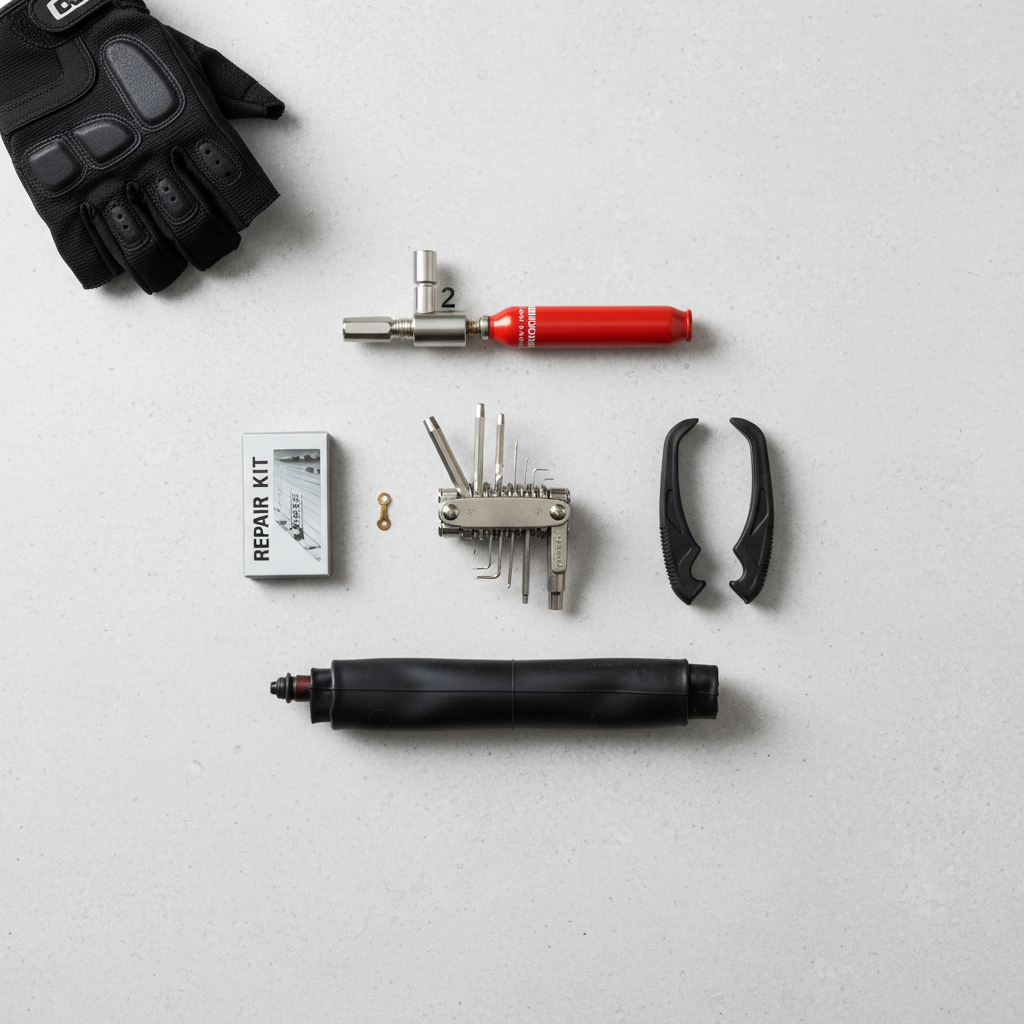
If you want a baseline answer to what tools every cyclist should have, this is the core kit that covers the widest range of situations for most road, gravel, commuting, and casual trail riding.
1) Flat-fix essentials
- Spare tube (or two): match valve type and length to your wheels.
- Tire levers: 2 levers usually enough, 3 helps with tight beads.
- Mini pump or CO2 inflator: many riders carry CO2 plus a tiny pump as backup.
- Patch kit: great for a second flat, or when you’re trying to save tubes.
If you ride tubeless, you still want a plan for a sidewall cut or a sealant failure: a plug kit and a backup tube can save the day.
2) A multi-tool that matches your bike
- Hex keys (Allen): typically 2/2.5/3/4/5/6mm cover most bikes.
- Torx key: T25 is common for disc rotor bolts and some stems.
- Phillips/flat bits: more common on accessories than on the bike itself.
Quick reality check: some multi-tools skip the sizes your bike actually uses. Before you buy, check your stem, seatpost clamp, and brake calipers.
3) Chain help
- Quick link (master link): correct speed (9/10/11/12-speed) matters.
- Chain tool: ideally integrated into your multi-tool.
For many riders, a quick link plus a chain tool is the difference between riding home and calling for a ride.
Choose the right kit: road, gravel, commuting, mountain
Tools aren’t “one size fits all.” If you’re mainly figuring out what tools every cyclist should have for your riding style, use the table below to avoid overpacking and under-solving.
| Riding type | What to prioritize | Nice-to-have extras |
|---|---|---|
| Road | Tube, levers, CO2/pump, multi-tool, quick link | Patch kit, tiny valve core tool, latex/nitrile gloves |
| Gravel | Plug kit (tubeless), pump, multi-tool w/ T25, quick link | Spare tube, boot material, small sealant top-up |
| Commuting | Pump, tube, levers, multi-tool, lights, phone/ID | Small lock, disposable rain layer, zip ties |
| Mountain | Plug kit, pump, multi-tool, quick link, tire boot | Spare derailleur hanger, small first-aid kit |
One small but important point: disc brake bikes often want a T25 and sometimes larger hex sizes, while many older or budget bikes may surprise you with Phillips screws on accessories.
Quick self-check: what you should carry on your next ride
If you want a fast decision without overthinking, answer these questions and follow the suggestions.
- Do you ride more than 30–60 minutes from home? Add a second tube and a patch kit.
- Do you run tubeless? Add a plug kit and make sure your pump can seat a tire “enough” to roll safely.
- Do you have disc brakes? Confirm your multi-tool includes T25.
- Do you ride in debris-heavy areas (shoulders, city streets)? Prioritize tougher tires and carry a tire boot.
- Do you ride solo? Add a charged phone, ID, and a simple plan for pickup.
When people ask what tools every cyclist should have, they often mean “what covers me when I’m alone.” In that case, lean slightly more conservative on spares.
How to pack and use your tools (without hating your life)
Having the right stuff is only half of it, the other half is making it accessible and usable when you’re tired or stressed.
Pack placement that actually works
- Saddle bag: best for leaving a kit on the bike, less likely to forget.
- Jersey pockets: good for fast access, but watch sharp edges and CO2 cartridges.
- Frame strap: great on gravel, stabilizes weight and reduces rattling.
Practice two repairs at home
- Tube swap: remove wheel, use levers without pinching the new tube, inflate to a safe pressure.
- Quick link install: break the chain, thread it correctly through the derailleur cage, lock the link.
That practice session saves time later, but more importantly it lowers panic. You’ll also catch compatibility issues, like a missing hex size, before you’re stuck.
Common mistakes (and how to avoid pointless gear)
A lot of tool kits fail in real life for simple reasons. Here are the mistakes I see most often when riders try to decide what tools every cyclist should have.
- Carrying CO2 only: if the cartridge misfires or you need multiple attempts, you’re out of options. A mini pump is slower, but dependable.
- Wrong tube size or valve: know your tire width range and whether you need Presta or Schrader, plus valve length for deep rims.
- Multi-tool doesn’t fit your bike: missing T25, missing 8mm, or cheap bits that round bolts.
- No way to re-mount a tight tire: some tire/rim combos are brutal, consider an extra lever or a bead-jack style tool if needed.
- Overpacking “just in case” tools: a full-size adjustable wrench belongs at home for most riders.
Also, be careful with torque on carbon parts. If you’re unsure, tightening “a little more” can become expensive fast, a shop can help you set things correctly.
When you may need a bike shop or professional help
Tools cover quick fixes, not every problem. If any of these show up, it’s usually smarter to stop riding and get help.
- Persistent brake rub or weak braking: could be pad contamination, rotor issues, or hydraulic problems.
- Cracks in frame, fork, bar, or seatpost: treat as a safety issue, do not “test ride” it.
- Repeated spoke breaks or big wobbles: wheel may need tension balancing or rim inspection.
- Headset play that returns: might indicate worn bearings or incorrect assembly.
According to PeopleForBikes, safer riding also comes from good maintenance habits and properly functioning equipment, if you feel uncertain about brakes, steering, or structural parts, a professional inspection is a reasonable call.
Practical starter kits you can build in 10 minutes
Below are simple loadouts that work for many riders, adjust to your terrain and tolerance for carrying weight.
Minimum “get me home” kit
- 1 tube
- 2 tire levers
- Mini pump or CO2 inflator
- Multi-tool with common hex sizes
More resilient “I ride far” kit
- 2 tubes or 1 tube + patch kit
- Mini pump + 1 CO2 cartridge
- Multi-tool with T25
- Quick link + chain tool
- Small tire boot and a couple zip ties
If you’re still dialing in what tools every cyclist should have for your own rides, start with the resilient kit for a month, then remove items you never used and keep the ones that saved you.
Conclusion: build a kit you’ll actually carry
The best cycling tool kit is the one that stays on your bike and solves the problems you’re most likely to face, flats and loose hardware lead the list for most riders. Keep it compact, verify fit with your bike’s bolts and tires, and practice a tube change once at home.
If you want one action step today, lay your tools out, confirm your multi-tool fits your stem and seatpost, then do a quick “flat drill” in your garage, it’s the fastest way to feel prepared on the road.