
The best bike seat for long rides comfort usually isn’t the priciest saddle or the one with the most padding, it’s the one that matches your sit bones, riding posture, and the way your bike fits you.
If that sounds annoyingly specific, it is, and that’s why so many riders keep “trying seats” and still feel numbness, hot spots, or that deep soreness that shows up around mile 20. The good news is you can get to a confident choice without buying five saddles.
This guide breaks comfort down into practical pieces, saddle shape, width, cutouts, rails, padding, plus a quick self-check and a few setup moves that often fix 80% of the problem even before you swap anything.

What “comfortable on long rides” actually means
Comfort isn’t just “less pain.” On longer rides it’s usually a mix of pressure distribution (sit bones carrying load), soft-tissue relief (less perineal pressure), and stable support (no sliding or rocking).
Two riders can use the same saddle and report opposite results because their pelvic shape, flexibility, and handlebar drop differ. That’s also why “gel cruiser seats” can feel amazing for a short spin, then feel squishy and irritating after an hour.
According to International Society for Sexual Medicine (ISSM), reducing prolonged pressure in the perineal area can matter for comfort and health, especially for riders who notice numbness. If numbness persists, it’s smart to adjust fit and consider speaking with a qualified clinician.
Why long rides hurt: the common causes (and what they point to)
Most saddle discomfort comes from a handful of patterns. When you can name yours, choosing the best bike seat for long rides comfort gets much easier.
- Pressure or numbness in the center: often too narrow, nose angle too high, or you’re rotated forward and need a relief channel/cutout.
- Soreness on “sit bones” that feels bruised: sometimes the saddle is too wide, too hard for your current conditioning, or your height/tilt makes you rock side to side.
- Inner-thigh rubbing: saddle too wide at the front, bulky padding, or a shape that flares where your legs pass.
- Hot spots after 60–90 minutes: often friction from movement, a slippery cover, wrong shorts, or too much foam that compresses unevenly.
- Lower back/hip fatigue that “shows up as saddle pain”: fit issue, reach too long, bars too low, or core fatigue changes your pelvic angle over time.
One more reality check, even a great saddle can feel rough if you jump from casual rides to a 3-hour effort. Conditioning and good shorts matter, but they work best when the saddle basics are right.
Quick self-check: which saddle profile fits your body and bike?
Before you shop, take two minutes and answer these. You’ll avoid the classic mistake: buying a “sofa saddle” for a sport posture, or a narrow race saddle for a very upright bike.
1) Your riding posture most days
- Upright (cruiser/commuter): more weight on the saddle, usually wants a wider rear section and moderate padding.
- Moderate lean (hybrid/gravel endurance): balanced load, often best with medium width and a supportive, not-too-soft top.
- Aggressive lean (road race/TT): more forward rotation, often benefits from a shorter nose, flat-to-slightly-curved profile, and a center relief design.
2) Where the discomfort starts
- Center numbness → prioritize a cutout/relief channel and careful tilt.
- Sit bone ache → prioritize correct width and stable shape, don’t default to more padding.
- Chafing → prioritize narrower nose/edges and a cover that reduces friction.
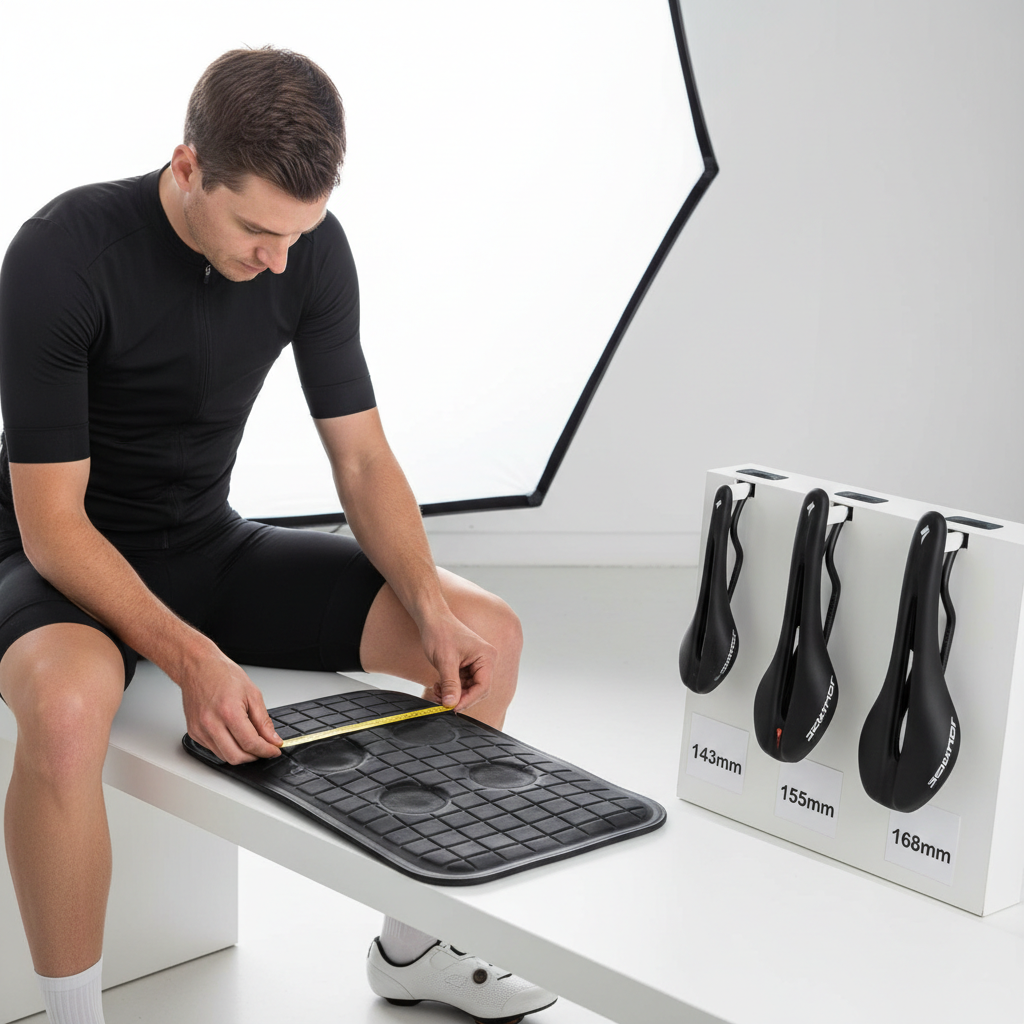
3) Your sit bone width (approximate is fine)
Many bike shops can measure sit bones quickly. At home, you can get a rough number using a piece of cardboard or foil on a firm chair, then measure the two deepest impressions. Comfort models are often offered in widths like 143 mm, 155 mm, 168 mm.
Rule of thumb: a saddle that’s too narrow pushes support into soft tissue, a saddle that’s too wide can rub and force your hips to rock.
Comfort saddle types compared (with a simple table)
This is where shoppers get lost, because every brand uses different marketing words. Think in categories and match the category to your posture and pain pattern.
| Type | Best for | Trade-offs | What to look for |
|---|---|---|---|
| Endurance road saddle | 2–6 hour rides, moderate lean | Can feel “firm” at first | Correct width, subtle relief channel, supportive foam |
| Short-nose saddle | Forward-rotated posture, numbness concerns | Some riders feel less “locked in” | Shorter nose, wide support platform, cutout option |
| Comfort hybrid/commuter saddle | Upright riding, city miles | Too wide/bulky for faster cadence | Wider rear, moderate padding, durable cover |
| Gel-heavy comfort saddle | Short casual rides, gentle pace | Can increase friction, “hammock” feel on long rides | Firm base under gel, not overly soft, good shape |
| Leather hammock-style saddle | Touring riders who like a broken-in feel | Break-in time, weather care | Tensioning system, correct width, proven touring design |
If you’re shopping specifically for the best bike seat for long rides comfort, most riders land in “endurance road,” “short-nose,” or “touring/leather” depending on posture and tolerance for firmness.
How to choose: the features that matter (and what to ignore)
Seat comfort is mostly geometry. Materials help, but they rarely rescue a mismatched shape.
Width and rear platform
Pick width based on sit bones and posture, not gender labels. Many brands offer multiple widths in the same model, which is usually a good sign.
Cutout vs. relief channel
- Full cutout: often helps if you feel pressure/numbness in the center, but edges must be smooth to avoid irritation.
- Relief channel: more subtle, can feel more stable for some riders on long rides.
Padding density (not “more padding”)
For distance, firmer support often wins because it keeps your pelvis stable and reduces rubbing. Overly soft foam can compress, create pressure points, and increase movement.
Shape: flat vs. curved
- Flatter saddles: easier to move around, often suits flexible riders and aggressive positions.
- More curved saddles: can feel “cradling,” sometimes better for riders who prefer a locked-in spot.
Rails and shell
Steel, chromoly, titanium, carbon rails affect weight and vibration feel, but don’t over-prioritize this. A saddle that fits is faster than a saddle that’s 40 grams lighter but hurts.
Setup matters: make a decent saddle feel great
Before you declare a saddle “wrong,” try these adjustments in small increments. Many fit issues show up as saddle pain, even when the saddle is fine.
Start with saddle height and fore-aft
- Too high often causes hip rocking and sit bone soreness.
- Too far back can increase reach, pushing you onto the nose.
If you’re unsure, a local bike fitter can save a lot of trial-and-error. According to International Bike Fitting Institute (IBFI), proper bike fit aims to improve comfort, efficiency, and injury prevention, which lines up with what most long-ride riders actually need.
Dial saddle tilt carefully
Most riders do well near level, then adjust by tiny steps. If you’re fighting center pressure, a slight nose-down change may help, but too far nose-down makes you slide forward and overload hands and shoulders.
Stabilize your “contact system”
- Shorts: a decent chamois and correct size reduces friction.
- Chamois cream: useful for long, hot rides, especially if you chafe easily.
- Handlebar reach: if you’re stretched out, you’ll rotate forward and blame the saddle.

Practical buying plan (so you don’t end up with a saddle drawer)
If you want the best bike seat for long rides comfort without guessing, shop with a process.
- Step 1: identify your pain pattern (center pressure, sit bone ache, chafing, sliding).
- Step 2: choose the category (endurance, short-nose, touring/leather, commuter).
- Step 3: pick width intentionally, ideally from a measured or estimated sit bone width.
- Step 4: buy from a return or demo program, many shops and brands offer comfort guarantees.
- Step 5: test correctly: 2–3 rides, include a longer steady effort, and avoid changing multiple fit variables at once.
Key point: if you swap saddle and also change height, cleat position, and shorts in the same week, you won’t know what fixed (or caused) the issue.
Mistakes that keep riders uncomfortable on long rides
- Buying the widest saddle “for comfort”: wide can be right for upright bikes, but too wide often creates rub on longer efforts.
- Chasing softness: squishy saddles feel nice in the parking lot, then cause heat and friction later.
- Ignoring saddle tilt: a few degrees can make the difference between stable support and constant sliding.
- Assuming numbness is normal: occasional discomfort happens, persistent numbness deserves attention and fit changes.
- Forgetting the basics: worn-out shorts, seams in the wrong place, or a saddle mounted slightly off-center can ruin a long ride.
When to get professional help (and what to ask for)
If you have persistent numbness, sharp pain, sores, or symptoms that last beyond the ride, it’s reasonable to consult a bike fitter and, when appropriate, a medical professional. Comfort problems can overlap with nerve irritation or skin issues, and self-experimenting has limits.
- Ask a fitter to check saddle height, tilt, fore-aft, and reach as a system.
- If you suspect a leg-length discrepancy or recurring hip/back pain, mention it early, it changes the approach.
- If you’re postpartum, recovering from surgery, or managing pelvic pain, a clinician’s input may be especially helpful.
Conclusion: a comfortable long-ride saddle is usually “right fit + right setup”
The best bike seat for long rides comfort is the one that supports your sit bones, relieves soft tissue pressure, and stays stable when fatigue changes your posture. If you take one action today, measure or estimate sit bone width and match saddle shape to your riding position, then fine-tune tilt in small steps.
If you’re shopping this week, prioritize brands or shops with demo/return options, it’s the most practical way to find your saddle without wasting money. Your future self, somewhere around mile 40, will appreciate it.